Tracking objects based on color is one of the quickest and easiest methods for tracking an object from one image frame to the next. The speed of this technique makes it very attractive for near-realtime .
First, let's start by looking at an image which contains an object to be tracked.
Let us consider
OBJECT = GREEN BALL
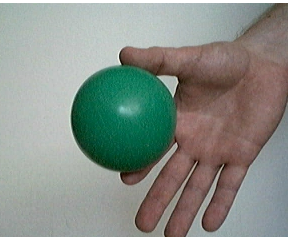
The sample image taken from ROBOT's camera contains a green ball. We'd like to move the robot away from the ball (i.e. backwards) when the ball approaches and move towards the ball (forward) when it moves away.
Detecting the green ball
The RGBFilter removes all objects in the image except the green ball. The RGBFilter is set to filter out green objects using an RGB channel subtraction and then normalizes the remaining values. This will highlight green objects nicely.

Ball Size
We don't really need the exact size of the ball since our movements will be based on any arbitrary measurement that is consistent from one frame to another. When that measurement decreases we should move forward, when it increases we should move backwards.
With the help of center of gravity module we now have some variables that we can use for this task. We will chose COG_BOX_SIZE and configure the module to show a bounding box around 80% of the pixels. The COG_BOX_SIZE is the width OR height of the bounding box as the bounding box in this case is always ensured to be square.

The COG_BOX_SIZE for image #1 is 148 while for image #2 it is 61. It is clear that we can use this number as a movement indicator to the robot.
This works well but we have a problem when images get much further away ...
Green Noise
This problem can be seen in the following images:

we can see that the processed image using the green RGBFilter introduces a lot of noise. Looking closely at the original image we notice some spurious green pixels that are somewhat isolated in parts of the image that are not actually green but form the transition from one color to another. We think this noise is introduced by the camera to digitizer process on the RoBot .
Keeping the ball at a distance
Now that we have our COG_BOX_SIZE variable we can arbitrarily chose 85 as the size that roBot should try to maintain (this equates to a couple inches from the ball). Doing so will require forward and backwards movement based on the relative size of the green ball or COG_BOX_SIZE. We also need to steer the robot to keep the ball in the center of the screen. This involves rotating the robot from right to left and moving the camera from up to down.
The roBot has two motors that control the left and right wheels independently. (This is nice since it can rotate in one spot.) we can send commands to robot via serial or parallel port.
Doing this translation will require a bit of logic. So we add in the VB script program module into the current processing pipeline. The VBScript module allows us to insert this program
The program first grabs our size variable COG_BOX_SIZE and compares it with what size we'd like to maintain in view. If the object is too big we move backwards by a relative amount or if the object is smaller than we'd like we move forwards. However, we also need to change the relative amounts for the right and left motors to ensure that we can rotate towards the ball ( object ) as appropriately.
The LEFT_MOTOR and RIGHT_MOTOR variables that are set are then mapped to the left and right motors using the communication module ( serial or parallel ).

PROJECT CODE:
' get the current center of the image
midx = GetVariable("IMAGE_WIDTH") / 2
midy = GetVariable("IMAGE_HEIGHT") / 2
' set the movement neutral range, i.e. if the
' cog is with range of the center of the image
' then consider it ok and move straigh. This
' helps to prevent fine tune movements that
' can cause oscillations.
range = 5
' determine the factor that scales image width
' to a range of 0 to 128 .. increase beyond 128
' if your robot turns too quickly
horizFactor = 200 / midx
' vertical factor ... we don't have much
' range here so the number is larger than
' horizontal movement
vertFactor = 300 / midy
' ball size when it is too close
ballSize = 40
' initialize our start motor values to neutral
left_base = 128
right_base = 128
' get the size (width or height) of the current
' bounding box
size = GetVariable("COG_BOX_SIZE")
' if it is equal to "" then no object was detected
if size > 10 then
' get the horizontal center of gravity found by the COG
' module
cogX = GetVariable("COG_X")
' if it is less than 75 the blob is on the left side
' of the screen so move that way
if cogX < (midx - range) then
left_base = 128-(midx-cogX)/horizFactor
right_base = 128
' otherwise move to the right if above 85 pixels (and no
' movement if 75 < cogX < 85 )
elseif cogX > (midx + range) then
left_base = 128
right_base = 128-(cogX-midx)/horizFactor
end if
' if the ball is too close then we have to move backwards
if size > ballSize then
left_motor = left_base+((size-ballSize)*2)
right_motor = right_base+((size-ballSize)*2)
' otherwise move forward
else
left_motor = left_base-((ballSize-size)*2)
right_motor = right_base-((ballSize-size)*2)
end if
' set the final motor values to be picked up by
' the SSC module
SetVariable "LEFT_MOTOR", CInt(left_motor)
SetVariable "RIGHT_MOTOR", Cint(right_motor)
' now lets work on the tilt ... grab the current
' tilt value
tilt = GetVariable("TILT")
' if it was not set then default to 220 (in our case
' this is horizontal to the floor)
if tilt = "" then
tilt = 220
end if
' if the blob is below 55 then tilt down up a bit more
' otherwise tilt up a little more
cogY = GetVariable("COG_Y")
if cogY < midy - range then
tilt = tilt - (midy-cogY)/vertFactor
elseif cogY > midy + range then
tilt = tilt + (cogY-midy)/vertFactor
end if
' we don't want to look up more than horizontal to the
' floor as we do not expect the
' ball to be on the ceiling
if tilt > 220 then
tilt = 220
end if
if tilt < 0 then
tilt = 0
end if
' and set that value for the SSC module too
SetVariable "TILT", tilt
else
SetVariable "LEFT_MOTOR", 128
SetVariable "RIGHT_MOTOR", 128
end if
VIDEOS

(3.9 MB) Video of the BucketBot from our perspective as it reacts to the green ball.
Please note that the following videos were taken on the bucketbot during processing so they are small.

(1.9 MB) Video of the BucketBot as it sees the ball and adjusts by moving. This is the original unprocessed video.

(1.4 MB) The processed video as performed on the BucketBot. The objective is to keep the green ball in the middle o

No comments:
Post a Comment